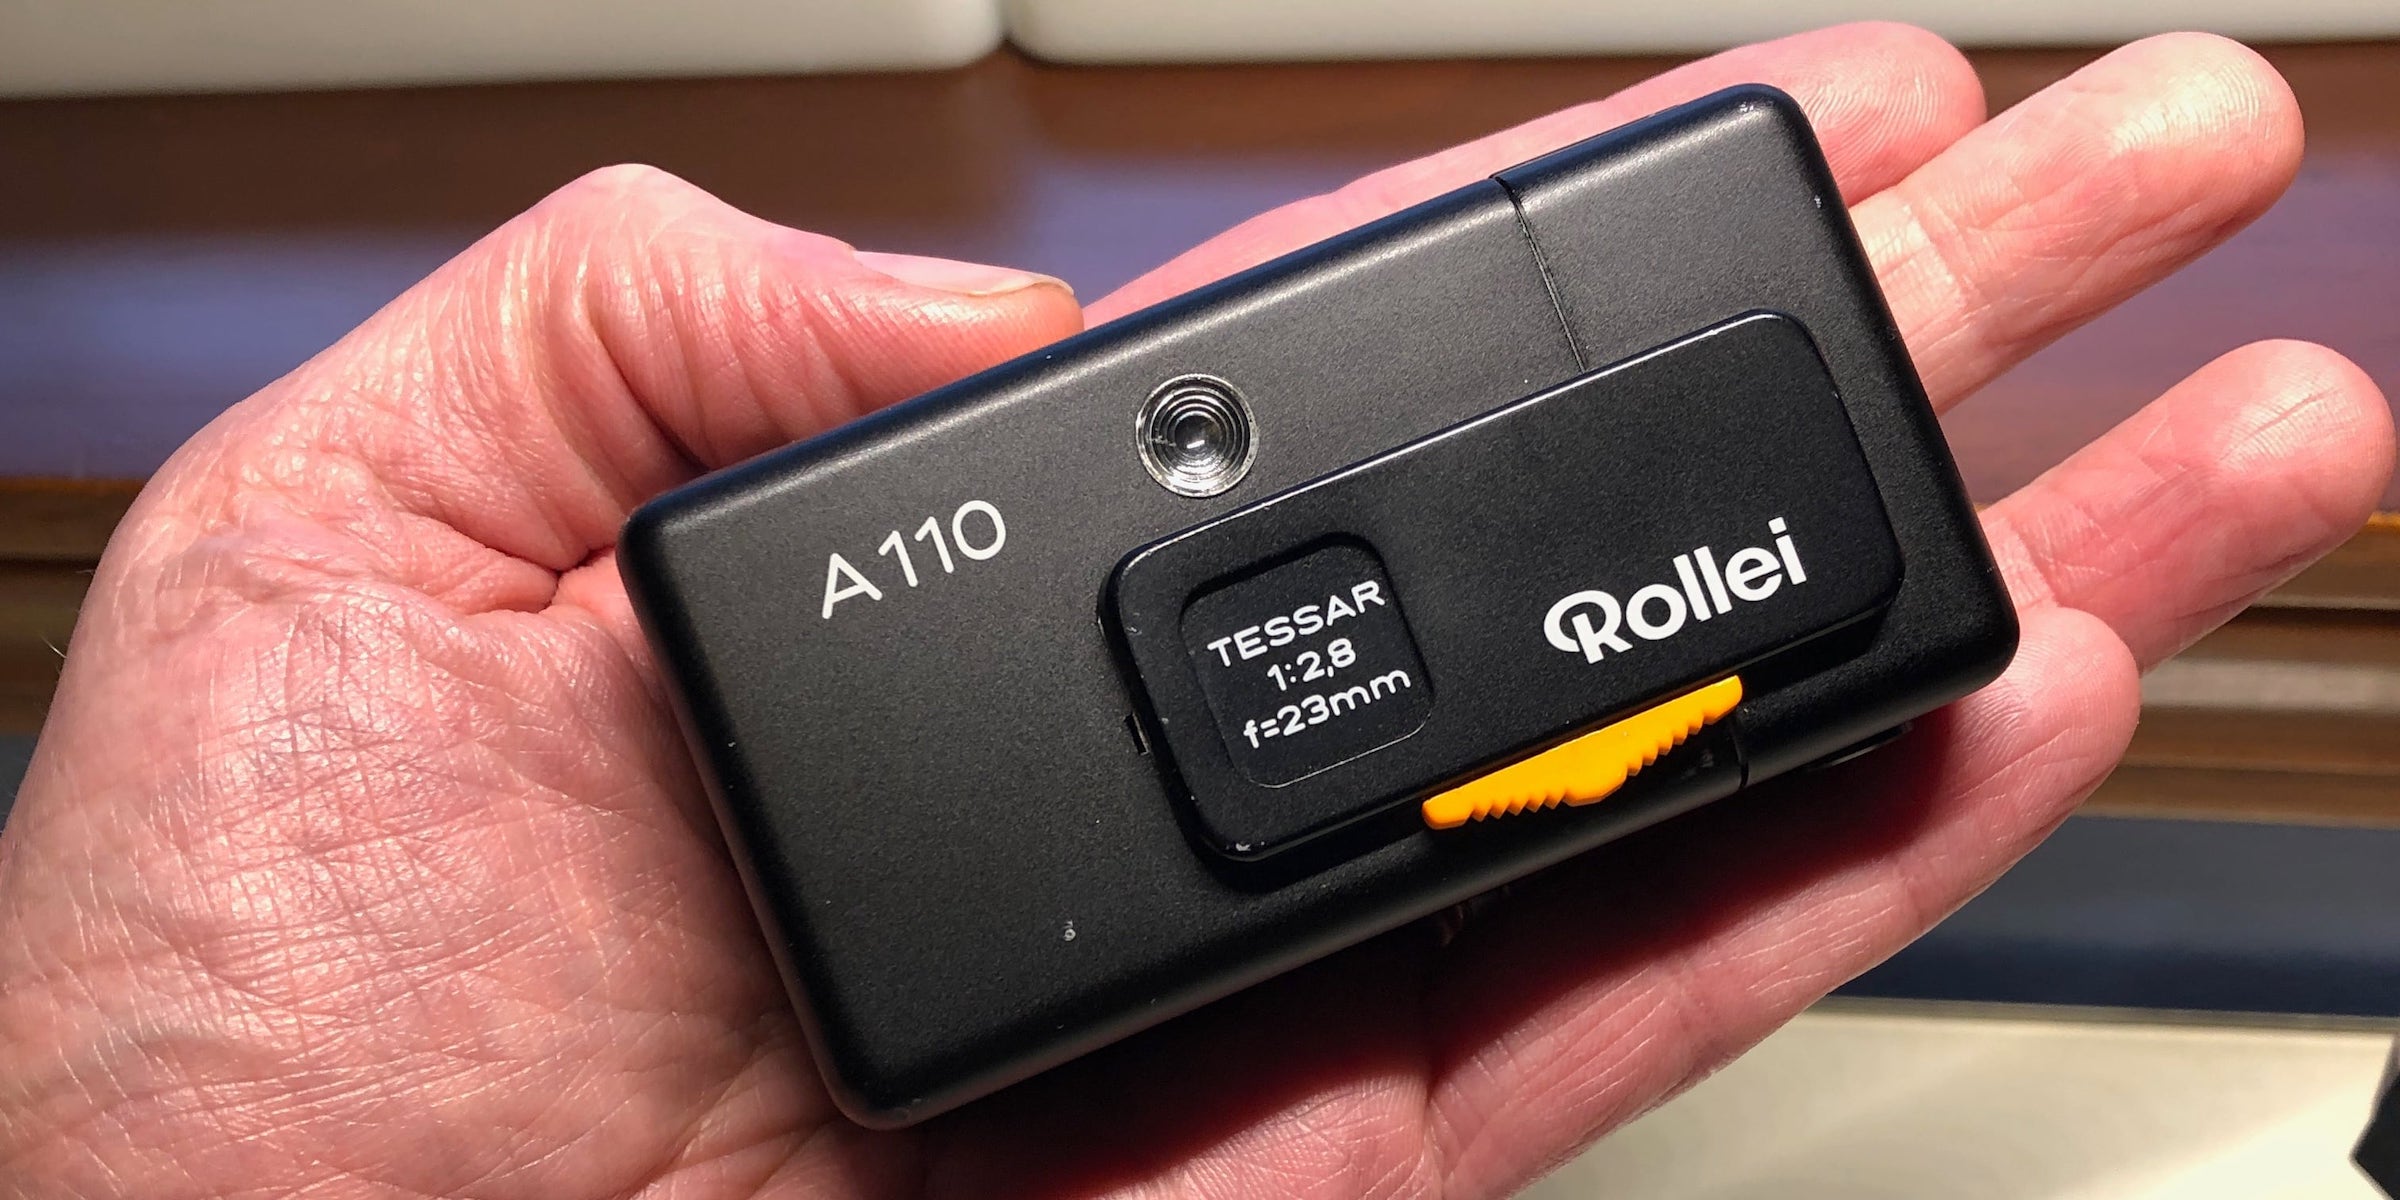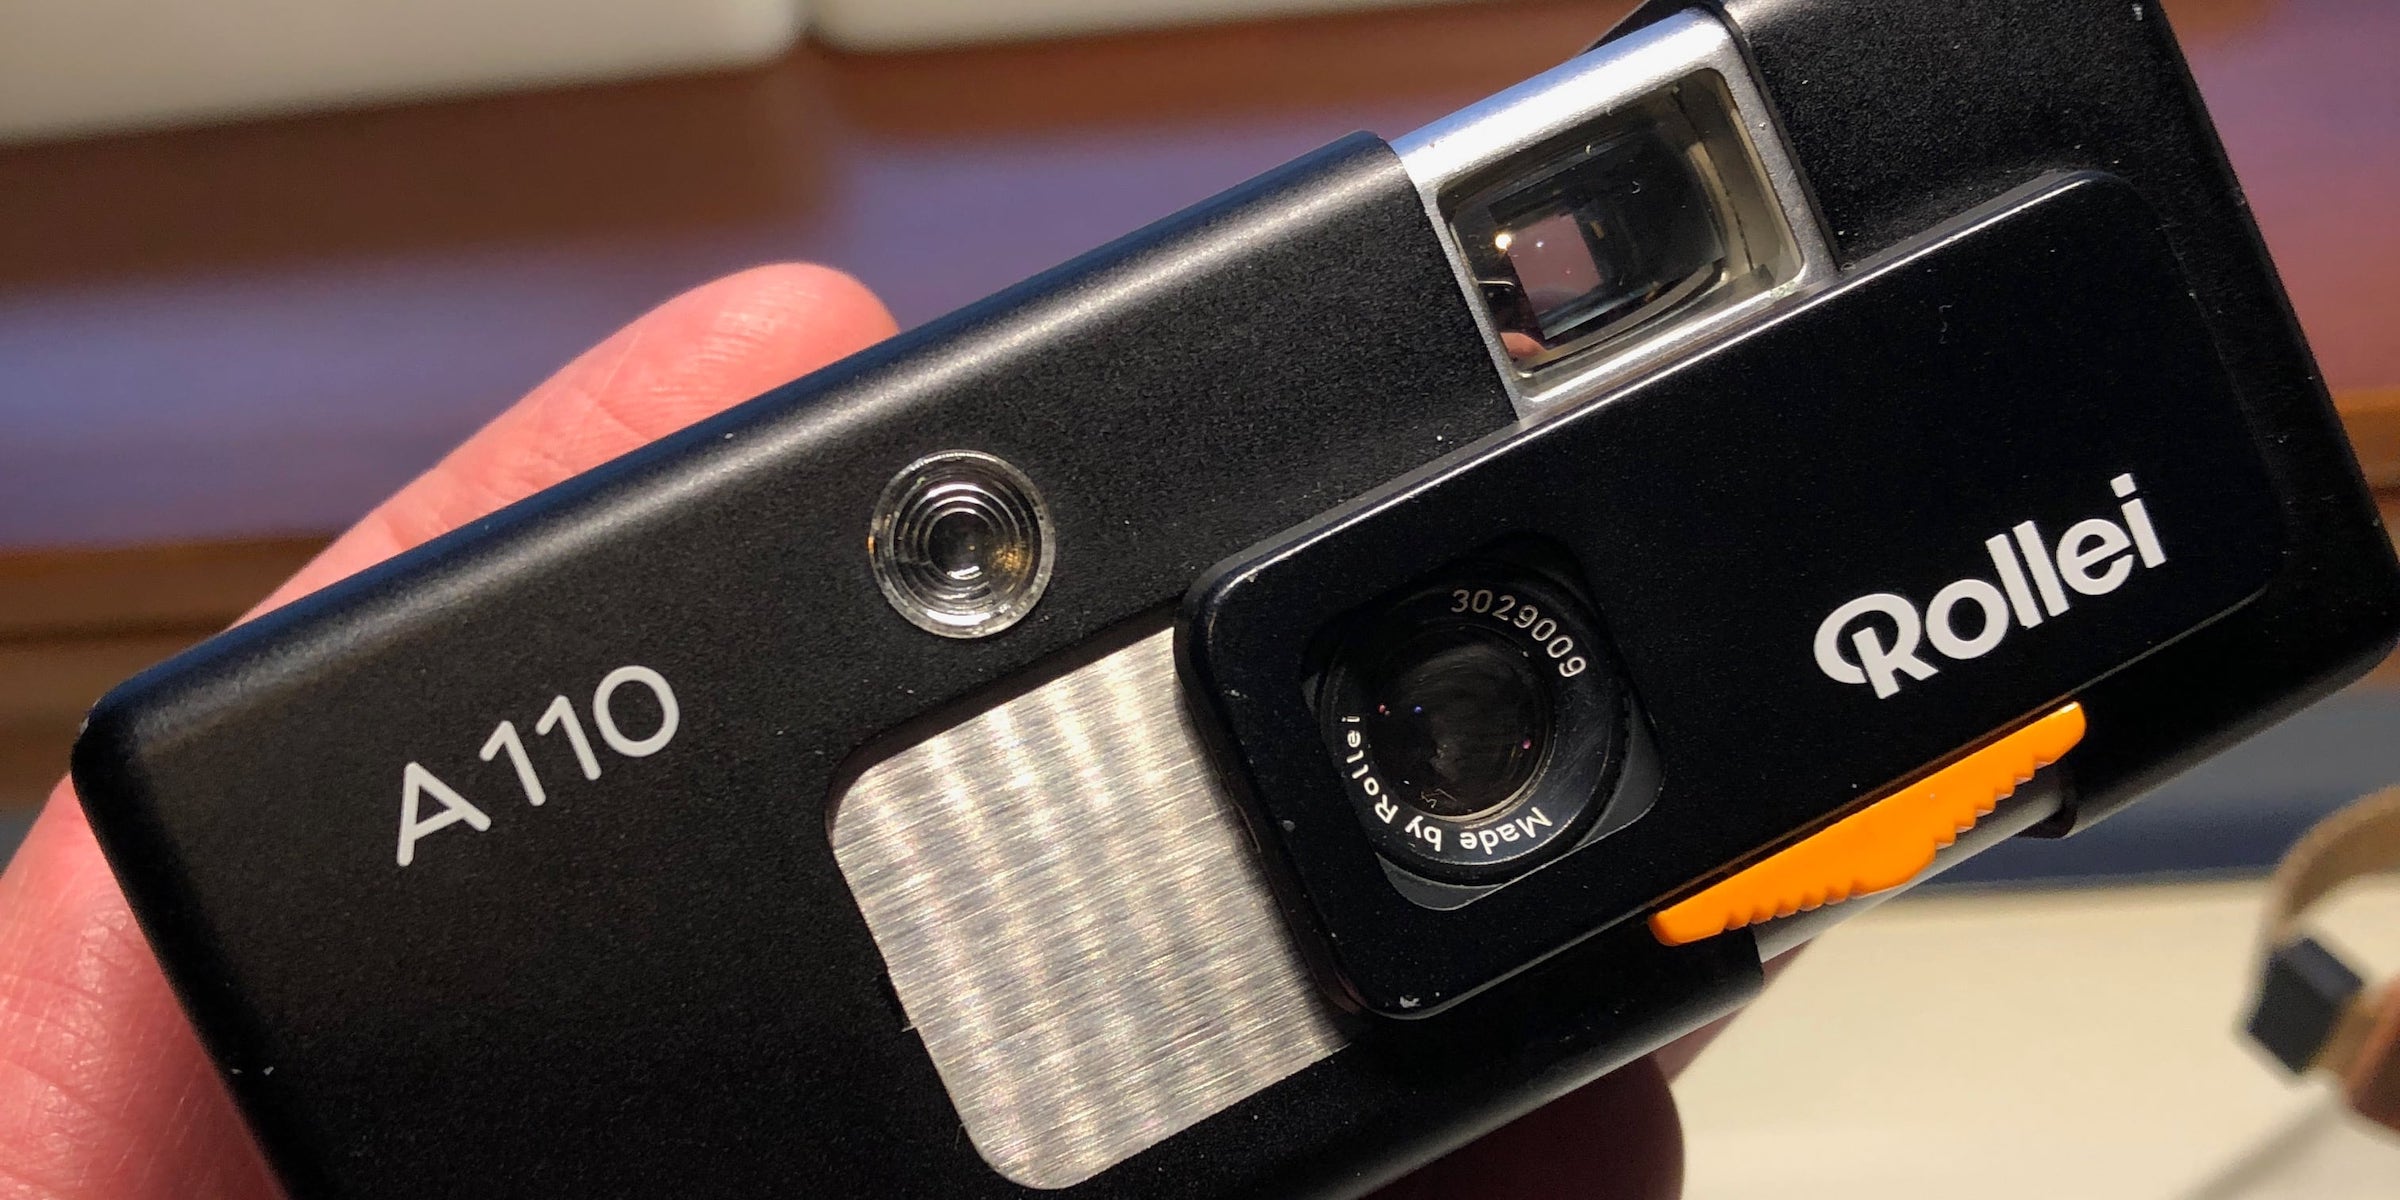
I had been bringing a tiny Minox LX camera everywhere I went, but I was at times disappointed in the lack of resolution and versatility. To address lack of resolution I thought that I might need to switch to one of the more compact 35mm cameras, such as the Olympus XA. But, then I remembered that the 110 format existed. The main problem with 110 cameras is that most of them were complete garbage, especially the ones which would come anywhere near the size of a Minox. I wondered if any quality 110 cameras were ever built, and if any of those were any smaller than the aforementioned 35mm cameras. I discovered a few, the smallest of which seemed to be the Rollei A110.
In the A110 I found a very small 110 camera with the potential for sharp photos due to the quality of the lens. Additionally this camera has a wider exposure range, and thus provide more versatility. The Minox LX has a very fast top shutter speed of 1/2000, with its fixed f/3.5 lens that gives a maximum exposure value of 15. The Minox’s minimum exposure value for non-tripod shots is 9. That’s a fairly respectable range. However, it doesn’t quite cover the range needed for northeastern Ohio winters where the scenes range from indoor to snow-covered outdoors. The shutter speed of the Rollei A110 tops out at 1/400. But, pairing that with the f/2.8 - f/16 aperture range actually covers exposure values from 8 to 17. So, the sacrifice in size could be made up for by the extended exposure range.
Convinced that the Rollei A110 could supplement my super handy Minox, I set out to find one at a bargain price. I found this one on ebay for just over $30. It was being sold by the person who last used it, and it worked when they last used it many years ago, but had no film or batteries to test it out. When I received the camera it did mostly work. Age, and perhaps the journey it took to get to me, took a toll on the camera. The first thing I noticed was that there were small bits moving around in the viewfinder. Next, I found that the focus lever was stuck. I briefly considered shooting it as-is before deciding I would open it up and fix the defects. The service manual for this camera is available online, which gave me more confidence. The manual provided some good advice, such as “how do you even get into this thing.”
Before dismantling the sliding sleeve trip the camera and push in the sliding sleeve only as far as the green test button. Depress the locking button for the sliding sleeve and pull out the sliding sleeve as far as it will go. Depress the lock button for the rear cover and pull out the sliding sleeve as far as it will go. Partially unscrew the crosshead screw and remove the sliding sleeve.
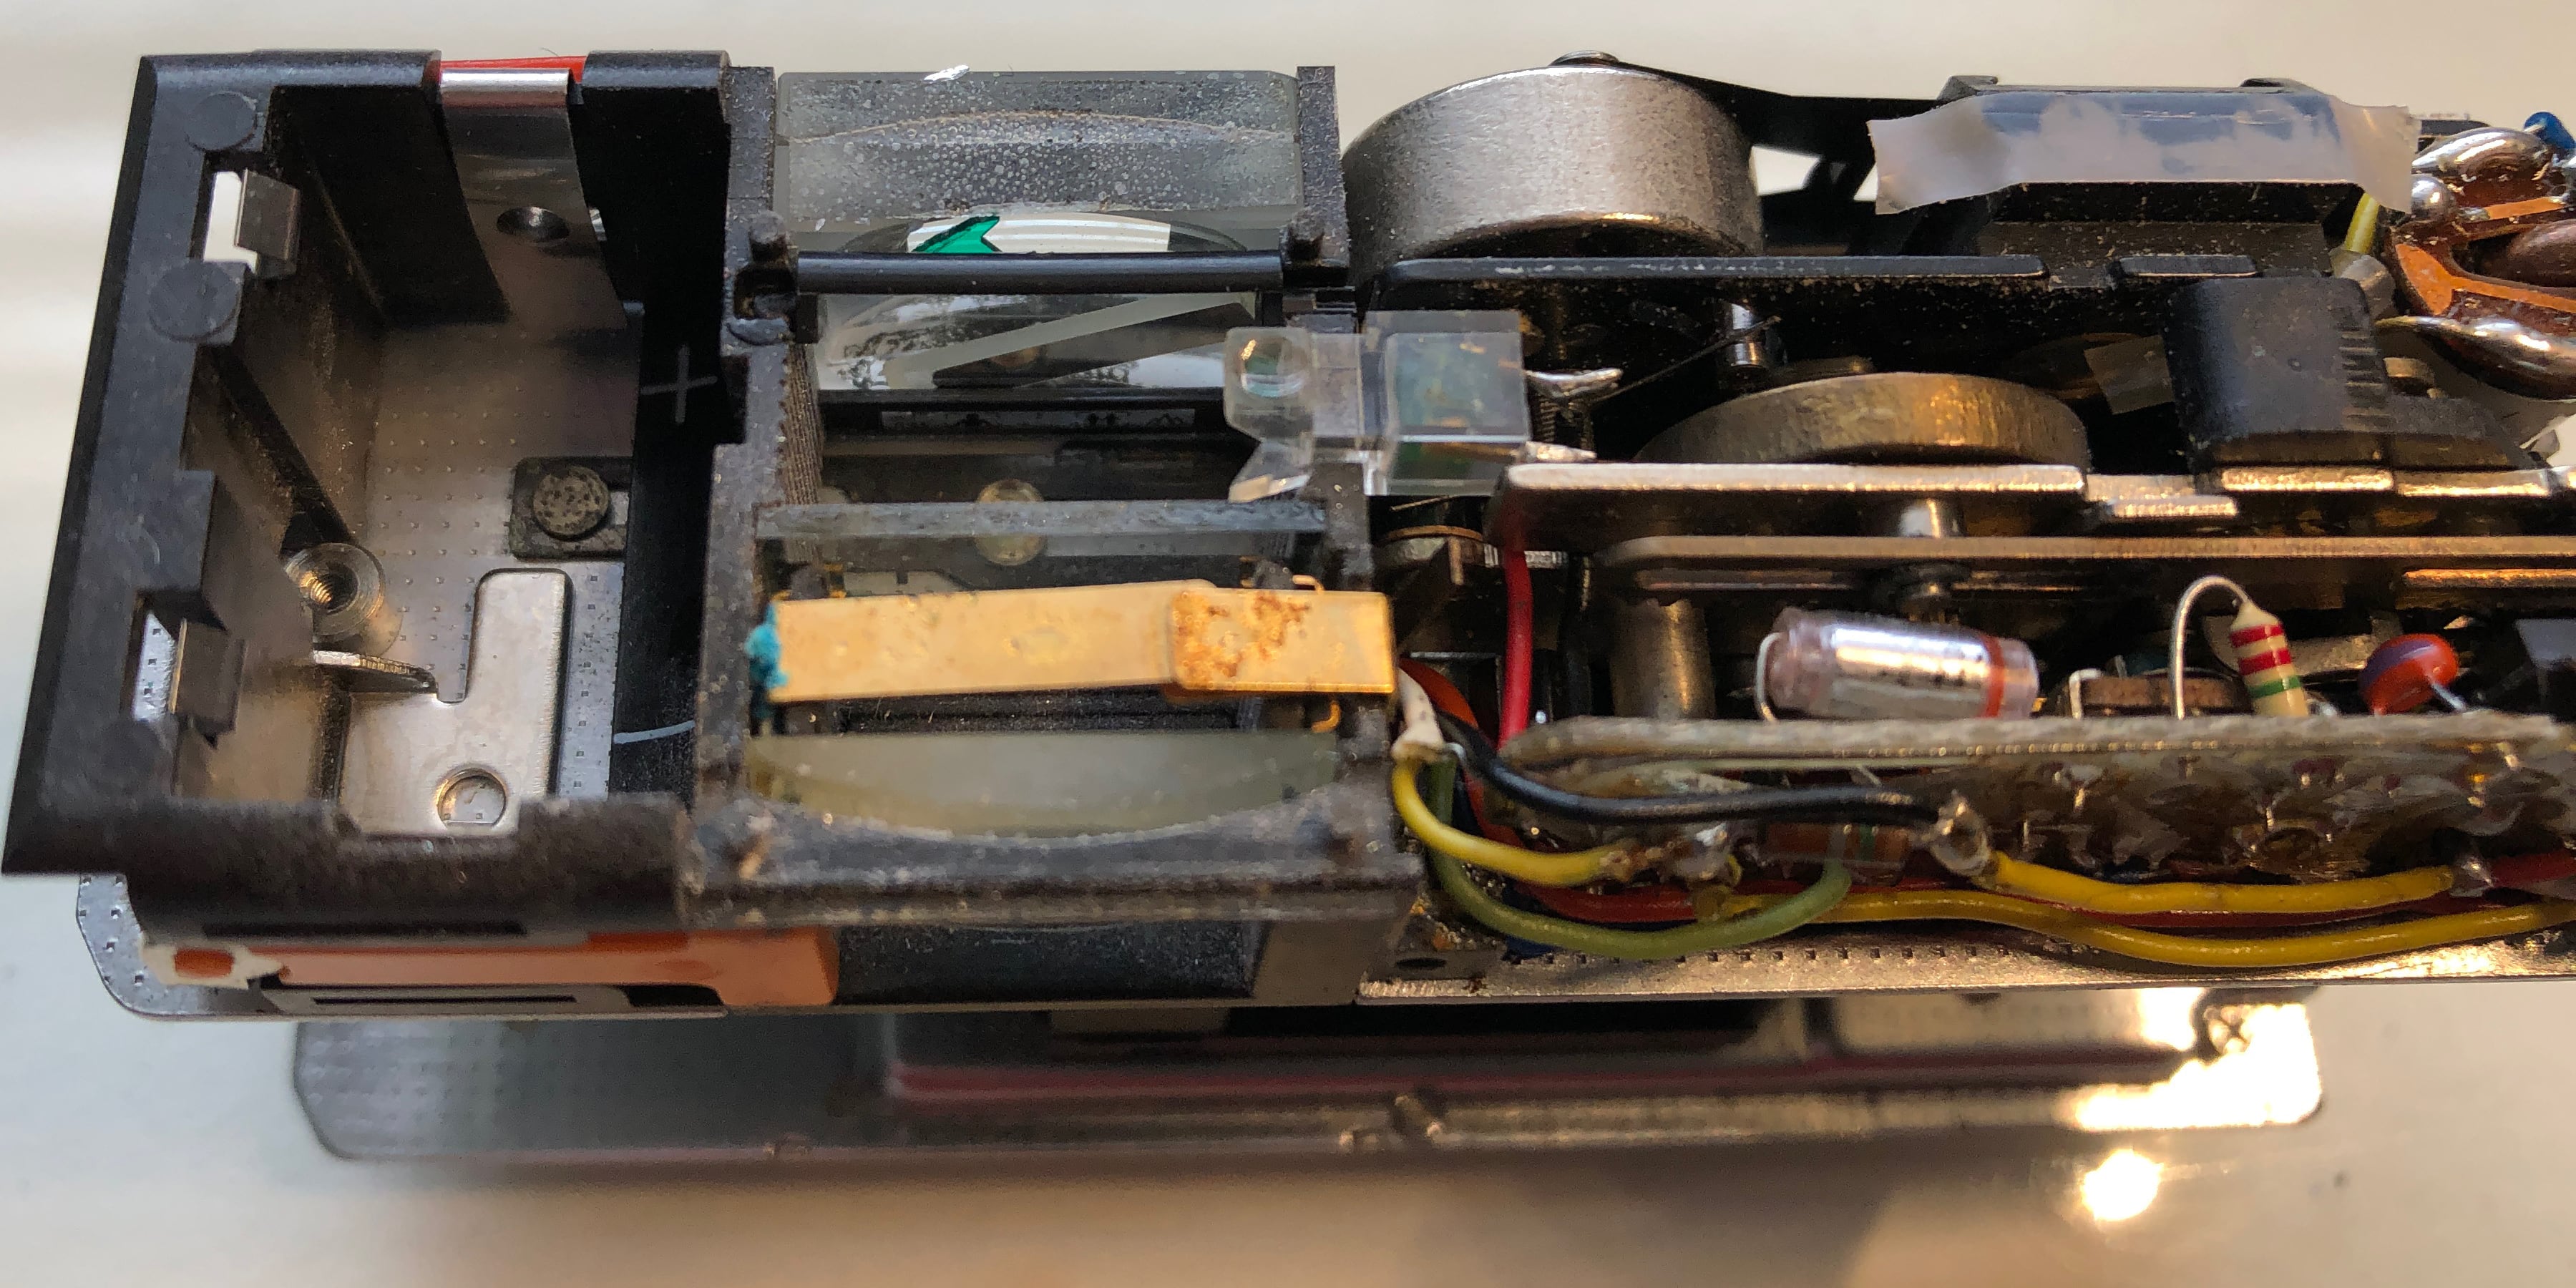
Getting to the viewfinder compartment required taking the entire outer shell off of the camera. After removing the sliding sleeve, the cover on the other side needed removed. That cover is held in by a screw at the end of the camera inside of the battery compartment and the tripod mount on the bottom of the camera. Next, the silver metal cover needs removed. It is attached with the screw clearly visible on the back of the camera and a screw under the lens cover compartment. The lens compartment cover needs to be popped off by releasing the tab on the “Rollei” side from inside the back of the camera, it is visible on the film take-up side. A small amount of force is required to pop it over the brass washer holding down the lens compartment frame. Removing the sliding lens cover reveals the second screw holding down the viewfinder cowling.
After the metal cover is unscrewed a small plastic tool can be used to pry it up off of the viewfinder. The green button on the top is held in place by the cover, so be sure not to loose it when removing the cover. Also be careful with the green LED and the plastic prism that covers it. Under the metal cover is another plastic cover, it can also be removed with a plastic spudger. Extra care should be exercised when working with the few plastic components of the A110. The plastic seems friable. I’m not sure if it was always that way, if age has degraded it, or if battery corrosion had something to do with it.
This camera still had an old mercury battery in it when I received it. Mercury batteries corrode differently than alkaline batteries, they don’t seem to expand and leak, rather they emit a substance which settles throughout the camera. As I disassemble a camera with this type of residue I wear latex gloves and an N95 mask. I then clean each part thoroughly. Some people try to neutralize corrosion with either vinegar or a paste of baking soda, but I prefer to scrub the corrosion away with alcohol soaked cotton swabs. Once I finish cleaning the corrosion I clean my workspace and dispose of all the cleaning materials before continuing.
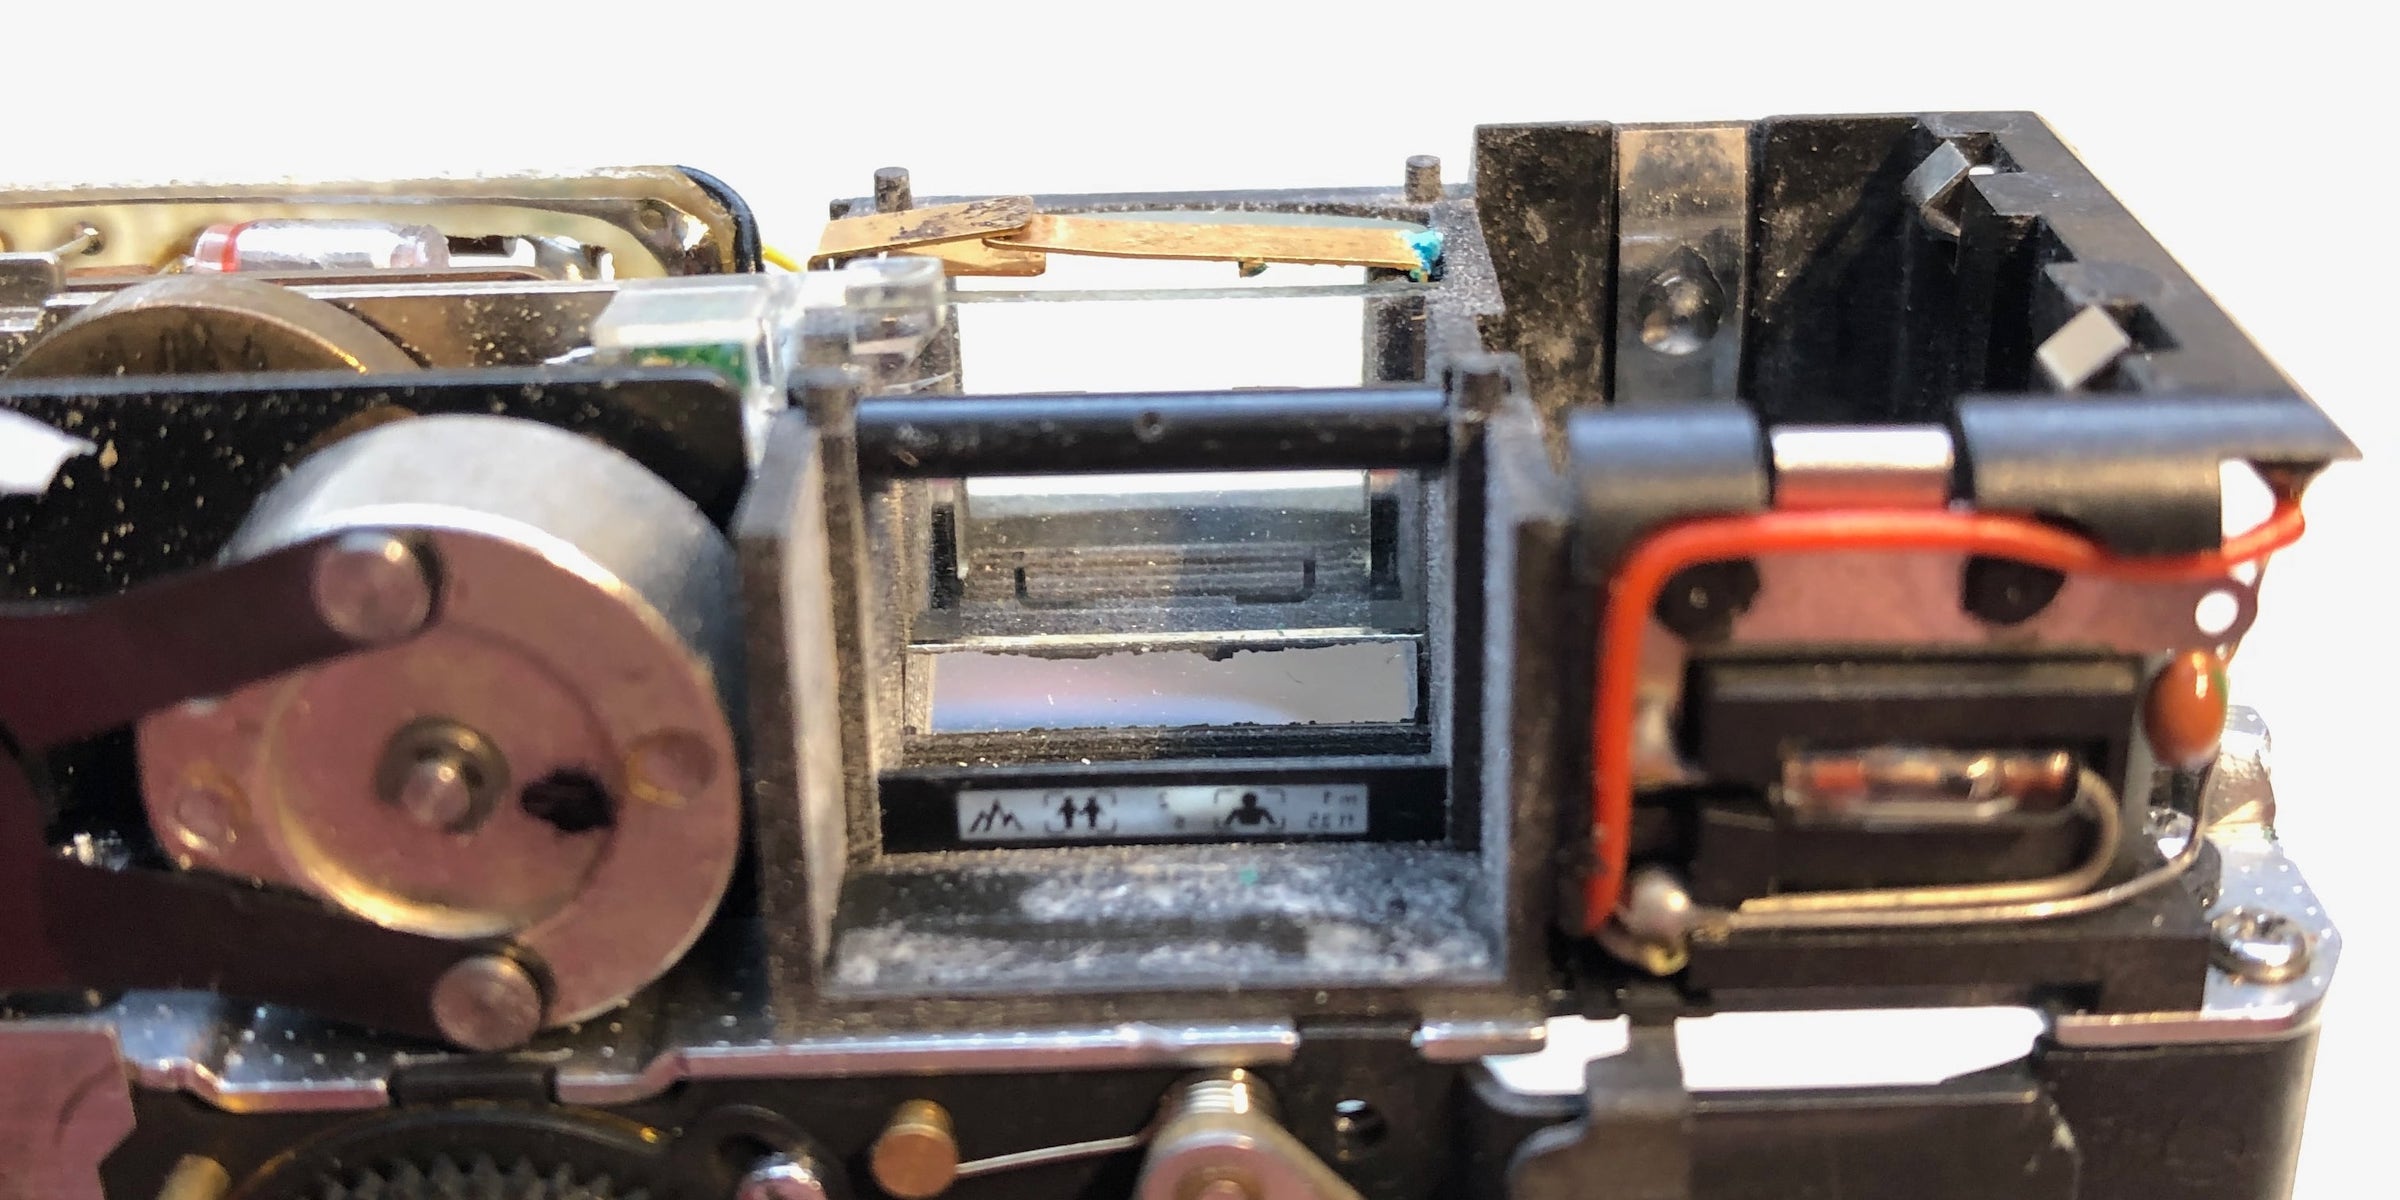
After removing everything covering the viewfinder compartment I was able to see what was bouncing around inside. There are two small rectangular mirrors used to show the focus scale in the viewfinder window. The lower mirror bounces external light onto the scale, and the upper mirror reflects the scale to the eyepiece. The upper mirror had came loose. And, it had probably knocked the small transparent green indicator needle loose too, since that was also out of place. The mirror was a little chipped from tumbling around, but still usable. A little bit of glue would hold them in place. Before I glued those pieces back in place though I needed to clean the focus needle slider which is under the viewfinder and stuck in place.
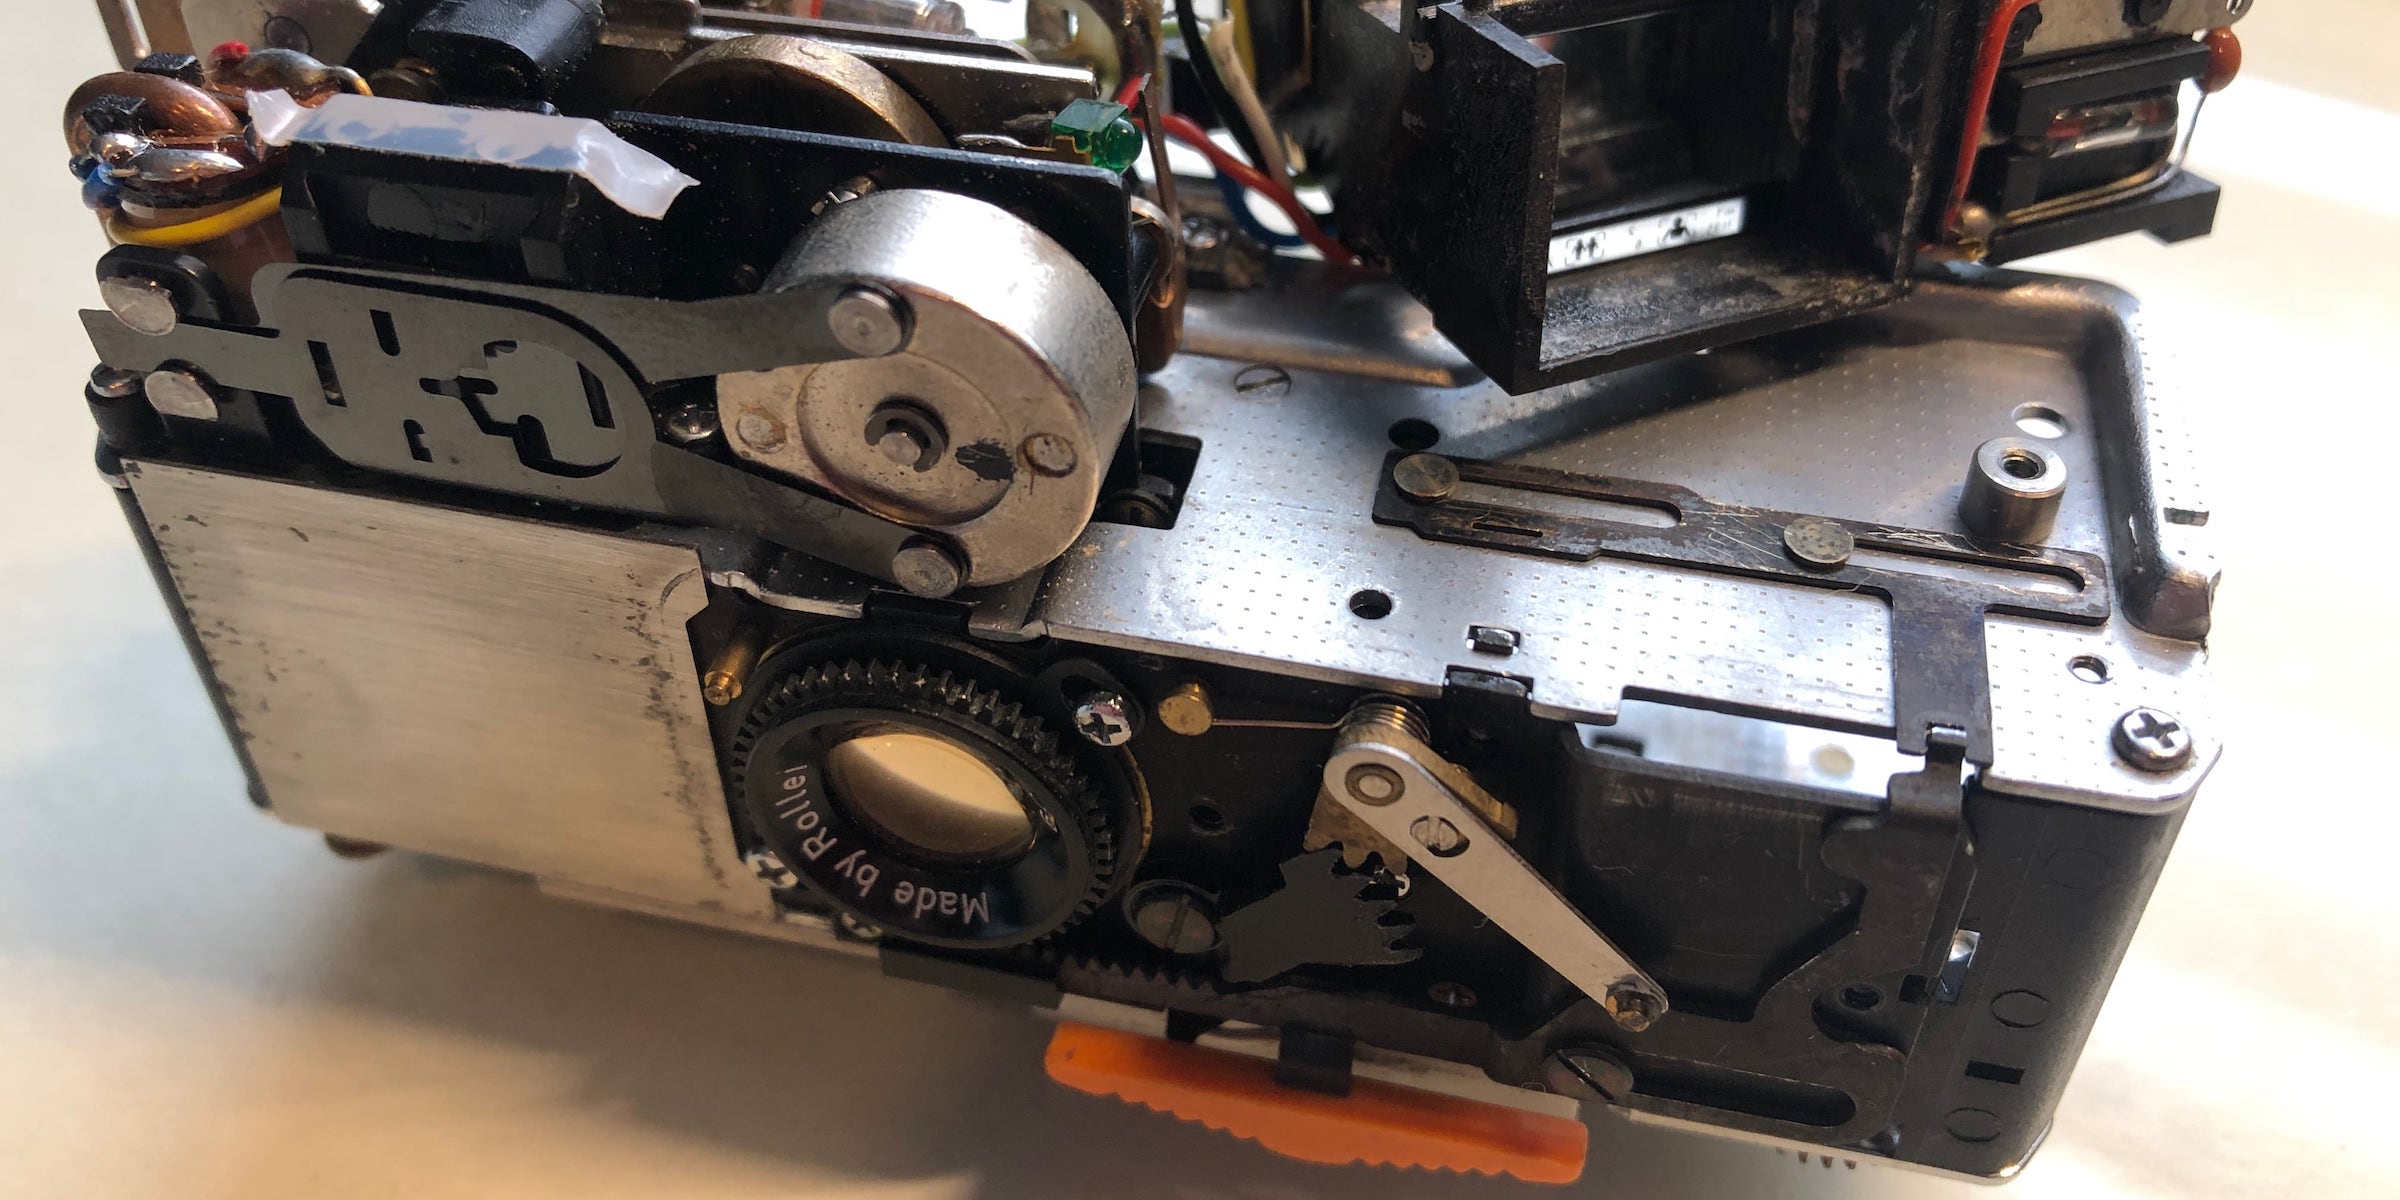
The focus needle slider connects the focus lever to the indicator needle in the viewfinder. The entire viewfinder assembly needs to be removed to get to it. The assembly is attached to the baseplate by one screw inside the battery compartment, and one screw under the bundle of wires to the right of the eye piece. There are also two plastic posts which keep the assembly in position. Accessing the screw under the bundle of wires is difficult to do without damaging the solder connections.
Once the assembly is unscrewed it can be pushed to the side so that the slider can be cleaned. After a bit of soaking with alcohol and nudging with a pick the slide began moving again. The action wasn’t smooth however, so a very small dab of grease was added to the path of travel. The slider was exercised until it moved freely, then all the exposed grease was cleaned off. With the focus slider on the front of the camera moving smoothly the assembly could be reinstalled.
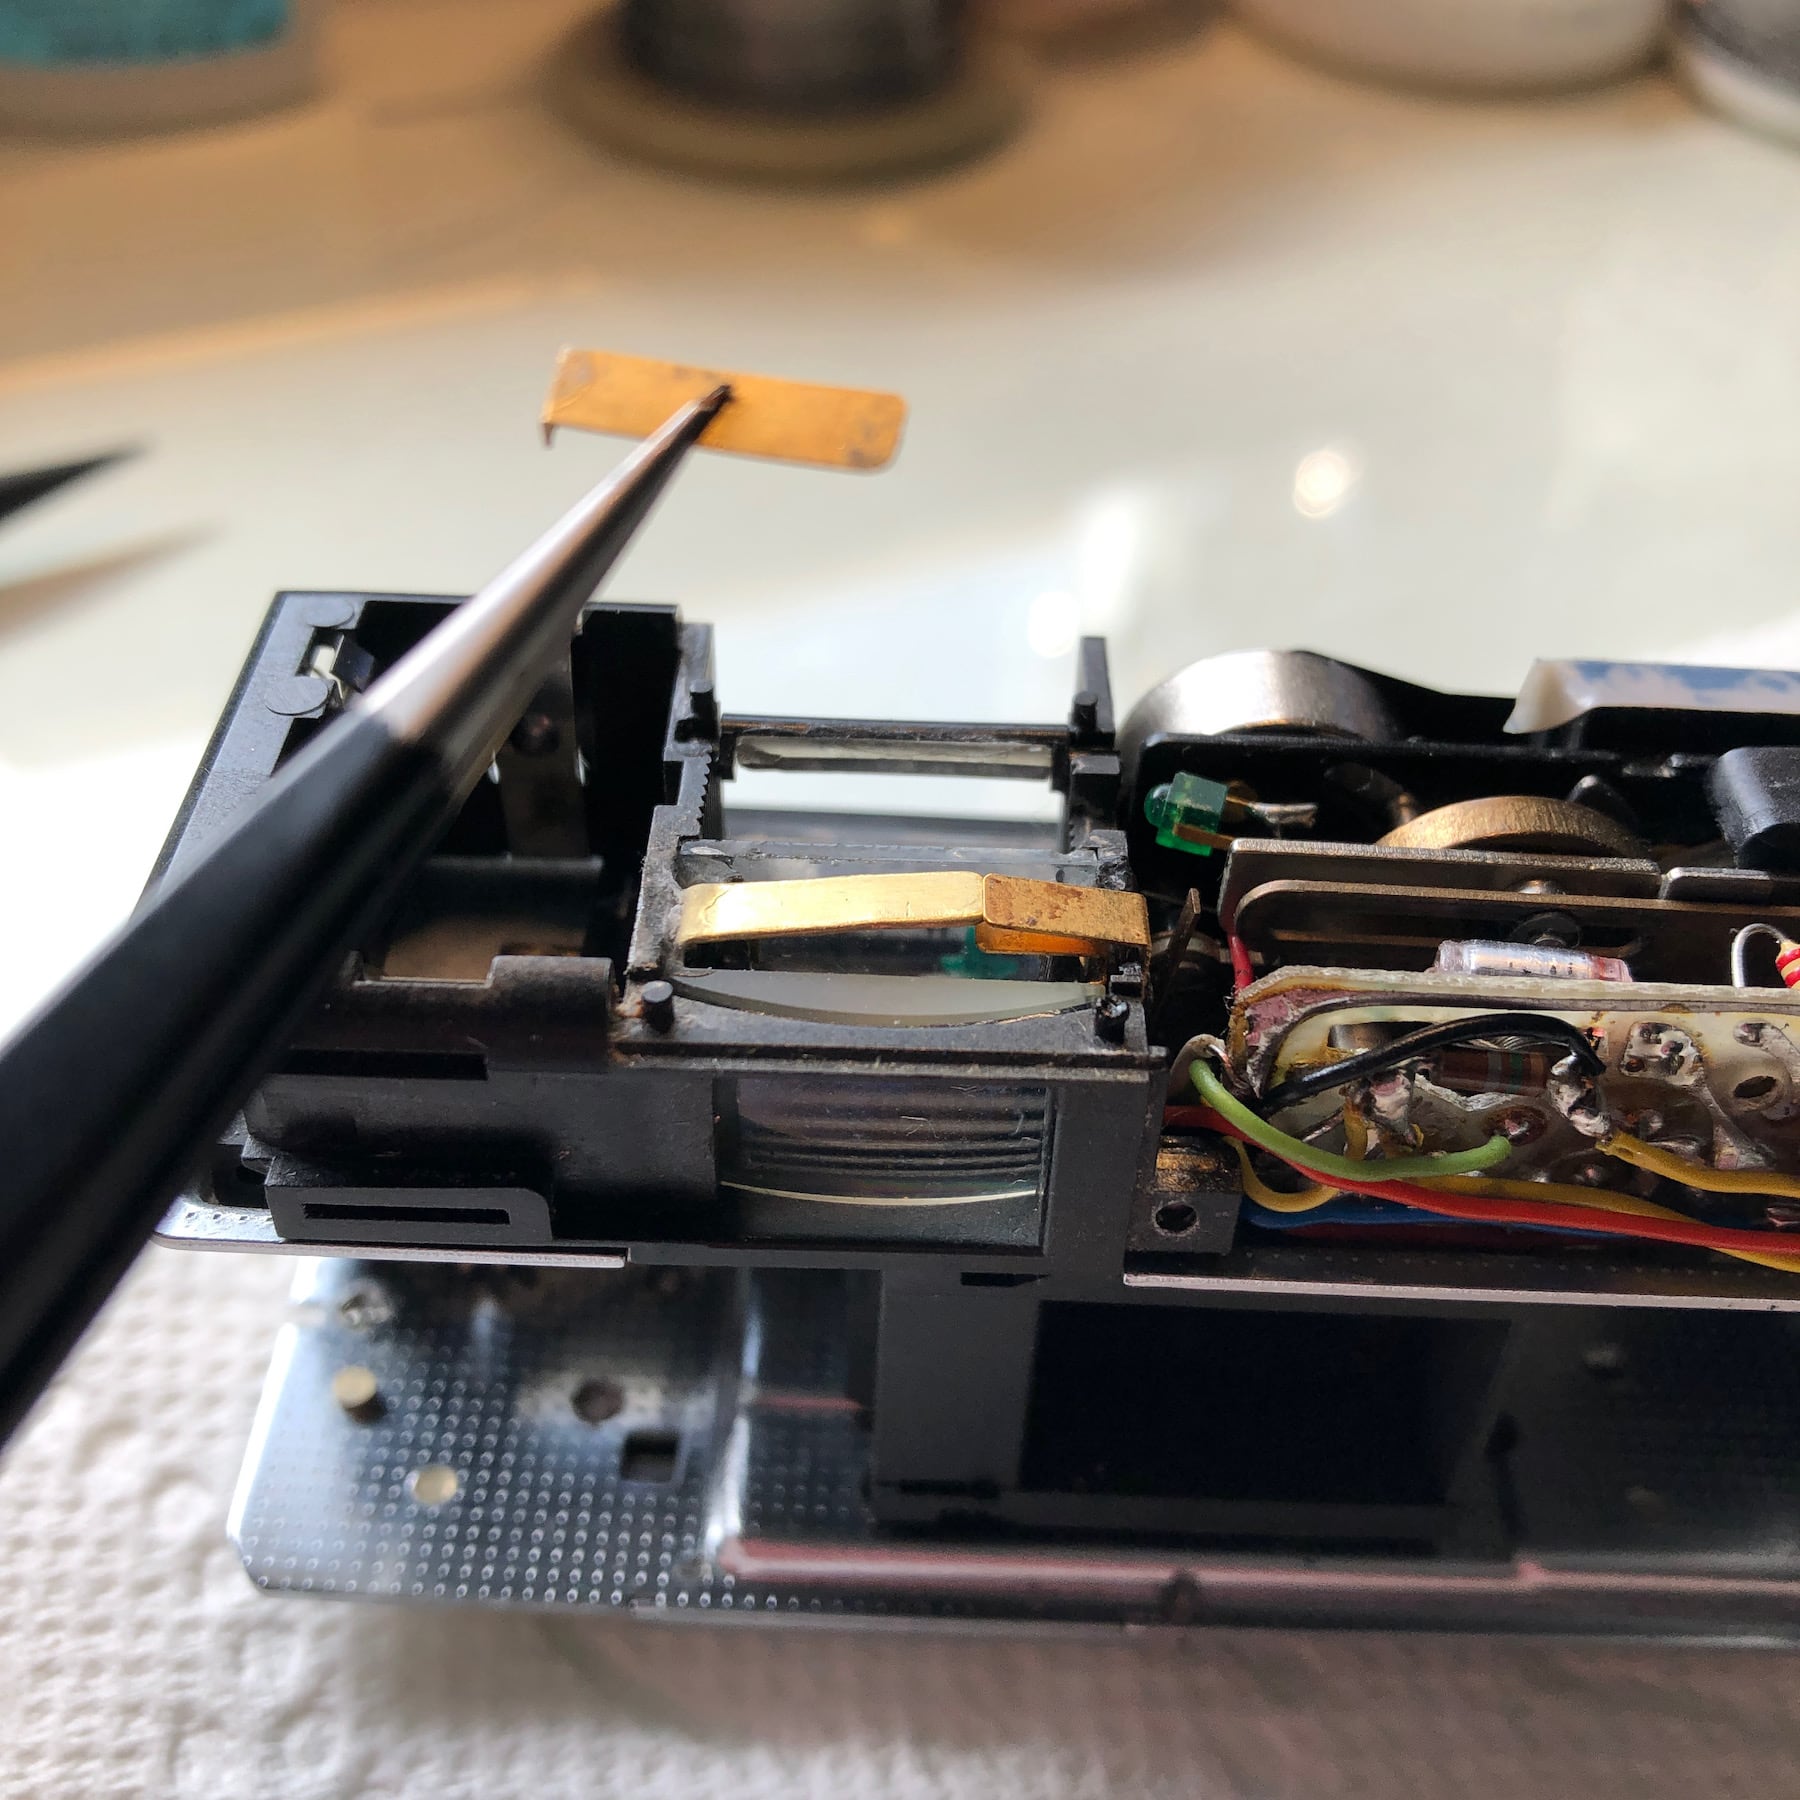
With the viewfinder assembly reinstalled but the viewfinder compartment still accessible, the glass elements of the viewfinder could be cleaned. I did not completely disassemble the internal parts of the viewfinder. I didn’t want to damage any of the electronics in the area. I tried to clean around the thin copper ribbon that serves as the switch contact for the light meter. Unfortunately I wasn’t gentle enough. It broke right at the corner where it flexes when the light meter switch is depressed. I had to solder it back in place with a small patch. I also added a drop of super glue just below the bend to help support it. This part will fail again in the future and I will need to get some thin copper to fabricate a replacement.
Update 4/4/2021: Sure enough, it failed. In order to repair the piece I needed to disassemble the camera beyond the stage which I had previously completed. I needed to remove the entire viewfinder assembly, which required desoldering the connections to the meter switch and the battery compartment. With the viewfinder assembly removed form the camera I could completely disassemble it, clean all the components, and replace the broken leaf spring for the meter switch. I fabricated a new switch spring from thin brass, because that is what I had available. After reassembling the viewfinder assembly I reassembled the camera itself, and everything was working again.
With the focus slider fixed it was time to glue the mirror and focus needle back in place. Next the A110 could be reassembled. Prior to reattaching the sliding sleeve I performed one last function check, and there was a slight problem. On this camera the aperture and shutter work in conjunction when a picture is taken. It starts when the camera is cocked. The shutter opens and the aperture blades close. When the shutter release is pressed the aperture goes to its selected position as the shutter begins to close. In my case the shutter opened, but the aperture did not close, so when the shutter was cocked I could see through the lens from the back as if it were in timed or bulb mode.
It took me a while to locate the source of the problem, but it was an easy fix. There is a small spring on the backside of the aperture wheel that is supposed to close the aperture when the shutter is opened. Somehow during the repairs this spring got knocked off of its post. The arm of the thin spring rotated down into the camera and was almost impossible to see. With a small pick it could be dragged up and set back onto its post. With that the Rollei A110 was ready to go back into service.
Paparazzi beware! Its the new Rollei A110…the smallest 110 camera in the world. The exquisite quality of this jewel like camera is immediately apparent. It is an extraordinary precision camera delivering excellent photographs. Computer exposure control automatically programs shutter speeds from 4 sec to 1/400 sec. Special flash cube adapter included.
Made in Germany in an elegant satin finish, all-metal housing featuring a Carl Zeiss four element 23mm Tessar f/2.8 lens. Carry it anywhere, it weighs a mere 6 1/2 ozs.
There’s nothing else like it. At your favorite camera store. Under $300.
Rollei A110 The Precision Pocket Camera
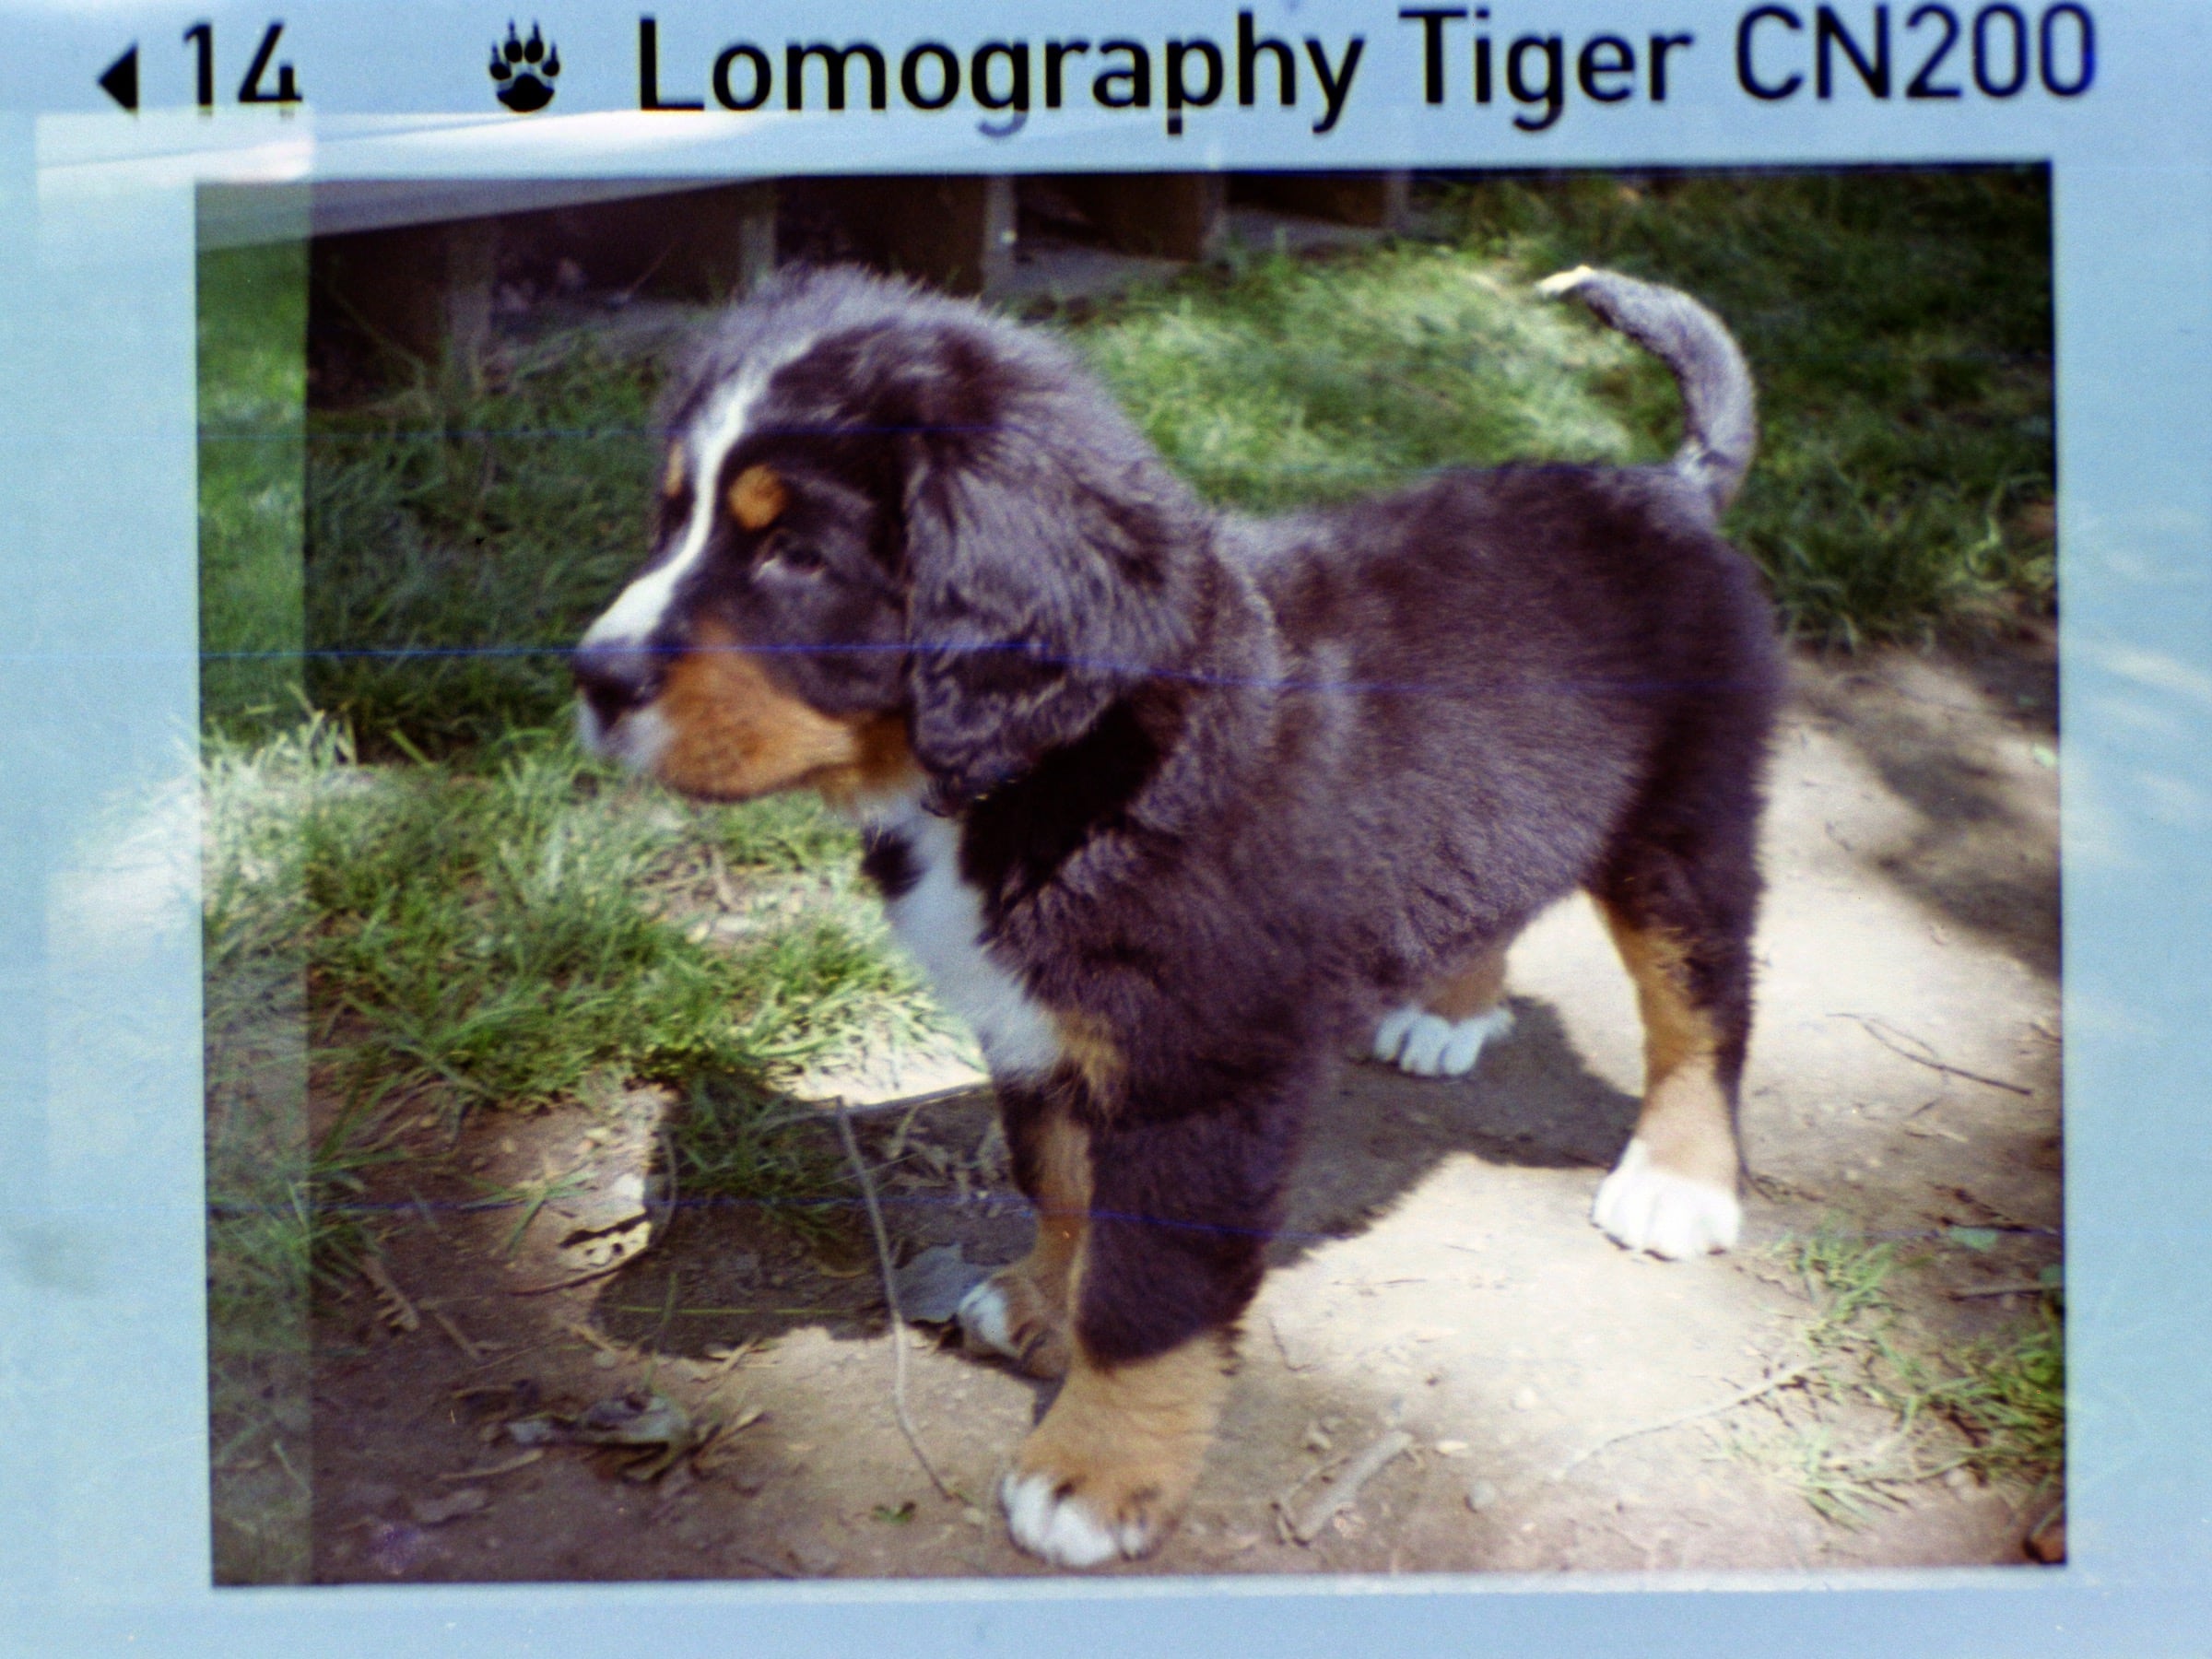
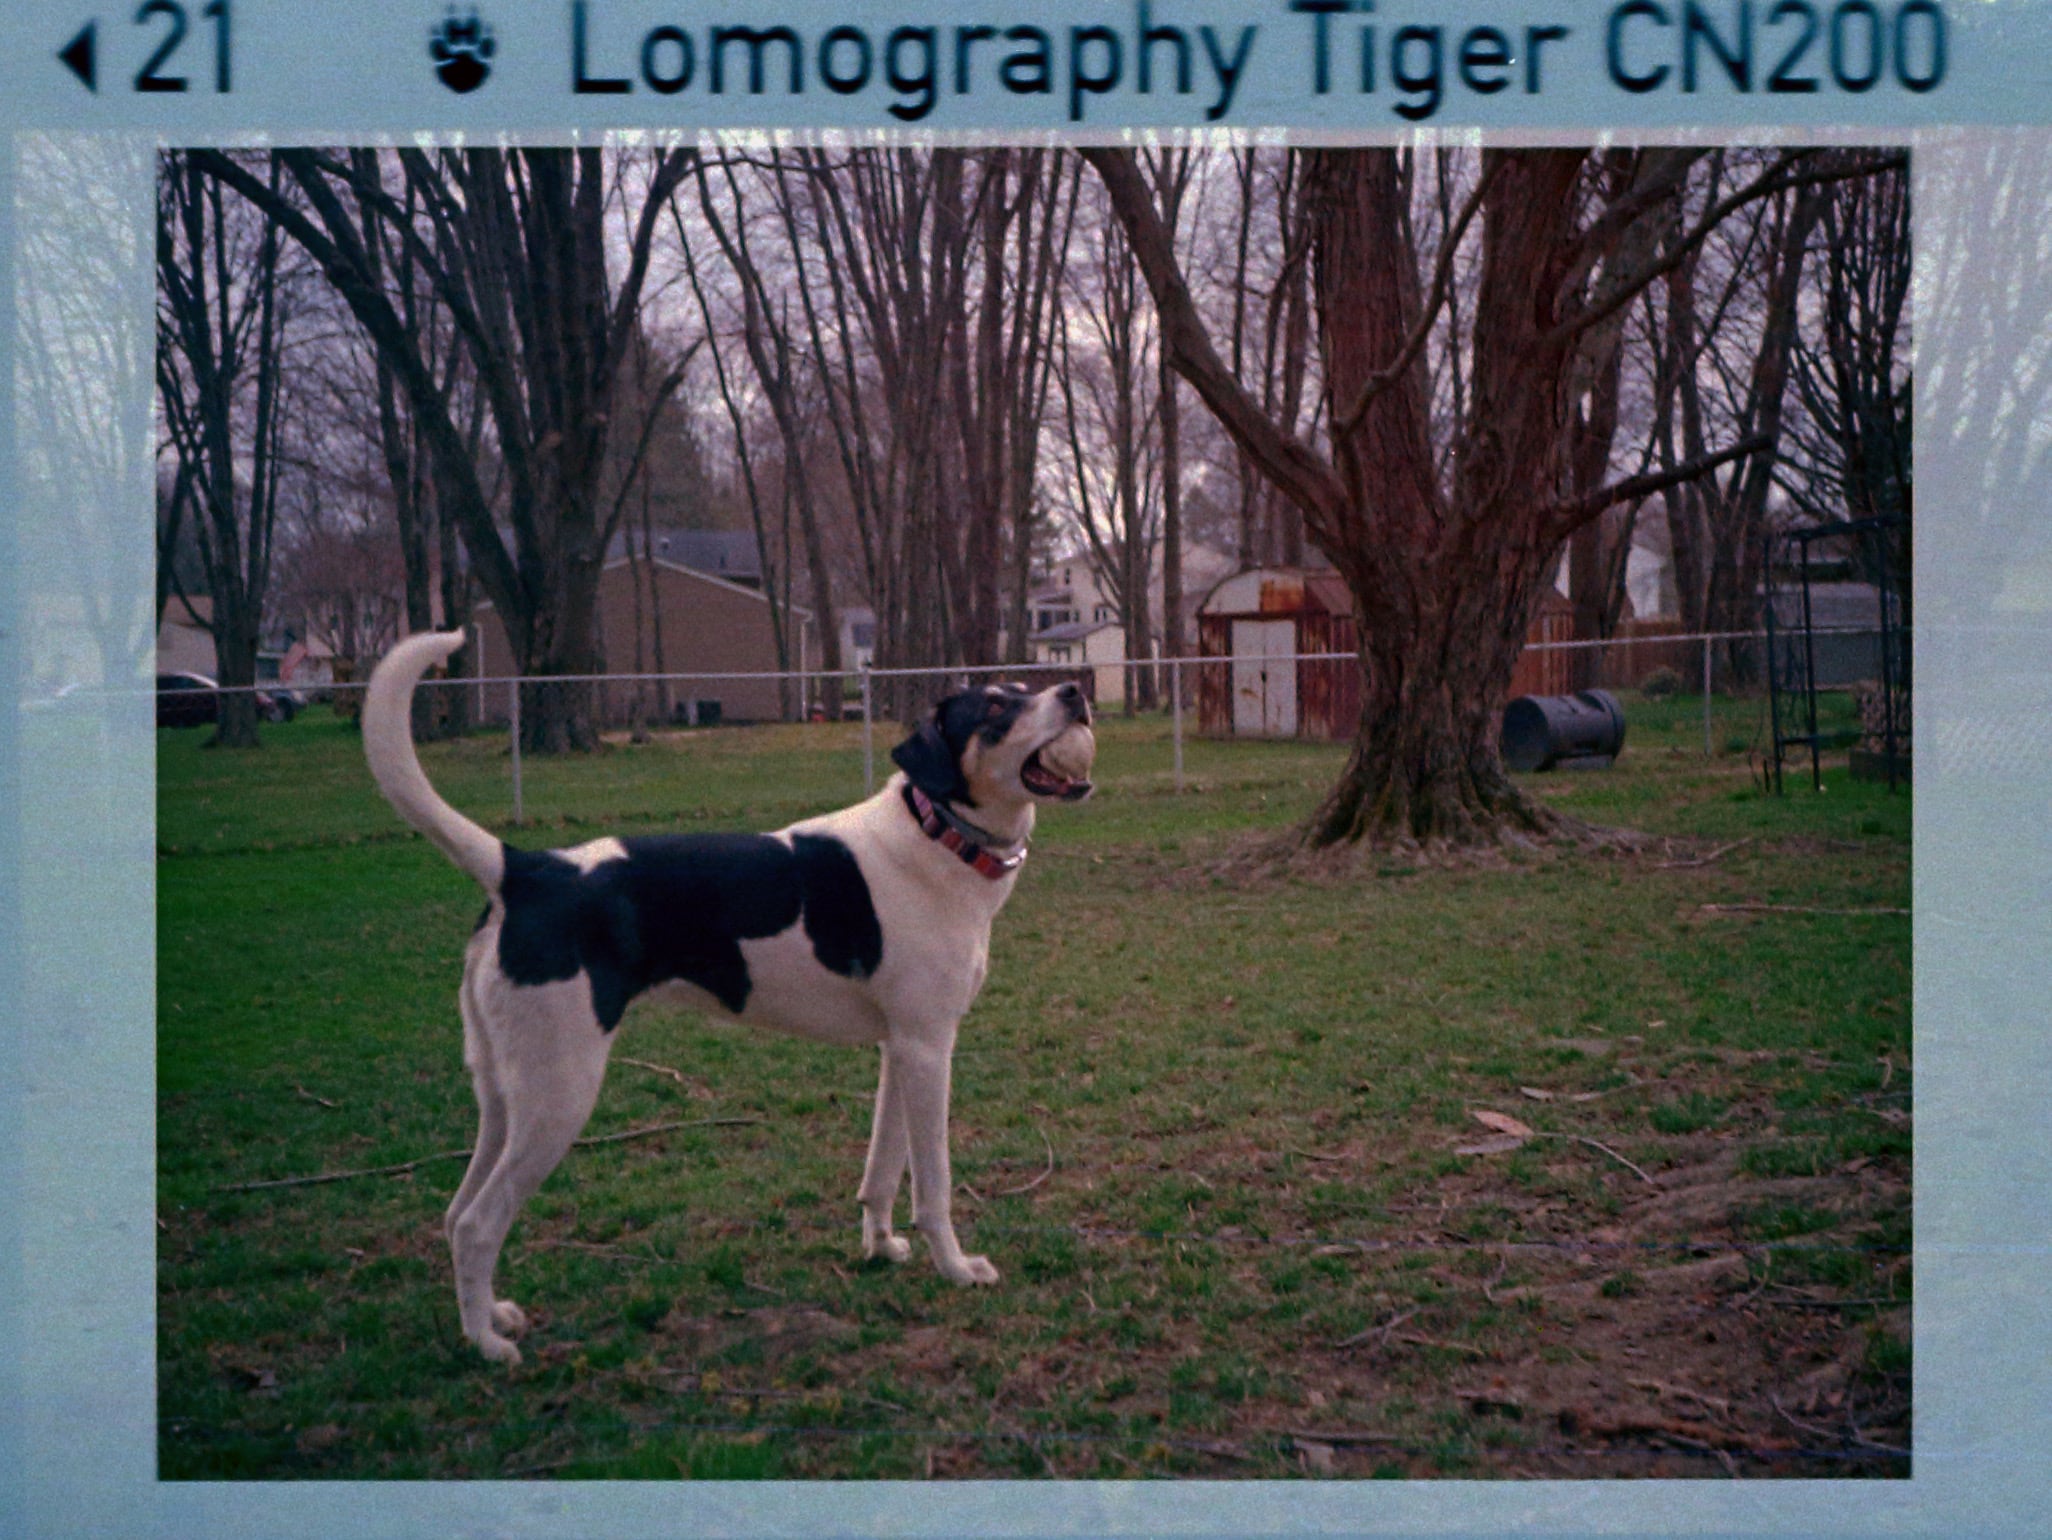
The viewfinder is large and bright enough, with an indicator of where the focus is. It does seem that the framing of the view finder may not always correspond with the frame on the 110 negative, since the camera seems to produce a larger negative than the film expects.